A faster website means a better user experience and a strong first impression. So, it is essential to optimize your WordPress website to improve its performance and speed. The Autoptimize WordPress plugin has made optimizing the site easy and quick.
Autoptimize is one of the best WordPress plugins to optimize your website. It is strictly an optimization plugin that is not only limited to caching the HTML, CSS, and JavaScript but also compatible with all the web hosting services.
Before we dive into the configuration and testing, we will look at what this WordPress plugin can do to make your website performance better.
What Autoptimize can do for your website?
Are you tired of spending hours optimizing your WordPress website and looking for an alternative solution? Autoptimize is specially designed to make the optimizing process simpler and easier. Let’s have a look at some of its capabilities:
- It combines all the CSS and JSS files on your website, so there are few files to download by the user’s browser.
- The optimizing plugin makes the files shorter by removing the extra content and white space from the files. It minifies the HTML, CSS, and JS files and makes them quicker to download.
- Autoptimize increases the speed by caching the HTML files, CSS files, and scripts. The plugin is also compatible with all the advanced caching plugins.
- The plugin moves some scripts to the page footer to speed up the website loading.
- It is easy to integrate your Content delivery network (CDN) files with Autoptimize.
Reasons why Autoptimize is the top choice of website owners
Here are the top three reasons why Autoptimize is the best optimization plugin:
- The free version of this plugin offers the complete set of features you need to optimize your WordPress website.
- It is compatible with all the web hosting services, even with the caching configurations.
- The plugin has over 1 million subscriptions, and the developers consistently fix the bugs and update the plugin with new features.
How to install and configure the Autoptimize into your WordPress website?
Installing Autoptimize is like any other WordPress plugin. The process is quick and simple.
To install the plugin, follow the below steps:
- Sign in to your WordPress admin dashboard.
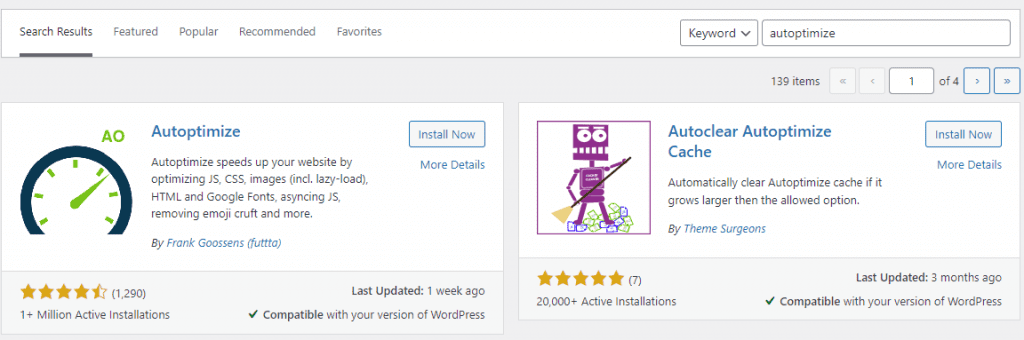
- Go to the plugin options and then click on Add New.
- Search for the Autoptimize and click on the Install now button.
- Once the installation process is completed, click on the Activate button.
Configuration of the WordPress optimization plugin
Once you have activated the WordPress plugin, you will see a new Autoptimize option on the top of the screen. Click on the title to go to the settings of the plugin. You can also jump to the settings by using the settings options on the menu.
Once you will go to the setting page, things will be simpler than you think. There are two modes for settings:
Basic setting mode: In this mode, you will get options to optimize the HTML code, JavaScript code, and CSS code. There is also an option to add your Content Delivery Network (CDN).
Advanced setting mode: There is also an option for the Show Advanced setting. This section has more options for you for HTML, CSS, and JavaScript optimization.
Autoptimize advance configuration – HTML, JS, and CSS setting
Configuring the Autoptimize seems an easy take. You only have to tick the boxes but it is crucial to know which option you need to tick and which not.
JavaScript setting
To optimize the JavaScript, simply enable the option by ticking the box. It is one of the most vital options in the Autoptimize setting. As soon as you will check the box, it will enable the JS minification, which ultimately increases the website speed.
Other available options are as follow:
- Aggregate JS files are all about aggregating and minifying the JS files.
- Also, Aggregate inline JS will increase the cache size and make website pages load faster.
- Force JavaScript in <head> makes loading time slower, so we don’t recommend it.
- Exclude scripts from Autoptimize stops the aggregation of the unwanted script.
- Add try-catch wrapping allows you to troubleshoot the broken files, but it is optional.
CSS setting
It is time to move to the CSS option. In this tab, there are many options to check. Similar to the JS options above, Optimize CSS Code, Aggregate CSS-files, Also aggregate inline CSS, and Exclude CSS from Autoptimize is also available for CSS.
It is also recommended to enable Also aggregate inline CSS only once you are aware that your cache is growing and you wish to delete it. Don’t enable the Inline all CSS as it will slow down the speed.
Depending on your images size, you can check or uncheck the Generate data: URIs for images. Autoptimize also skips images of large sizes.
HTML setting and CDN option
You will be able to delete whitespace and some comments of the HTML code of your website if you enable Optimize HTML Code. You can keep HTML comments by checking the Keep HTML comments box.
Entering your CDN (Content Delivery Network) root URL in the CDN Base URL tab is optional. You can put the URL of any CDN service you’ve set up here if you have one installed.
Misc setting
This option is right under the CDN options. There are a few other optimization settings in Autoptimize. You may need to reconfigure some of the settings if you are facing trouble loading optimized CSS and JS files.
Once you are done with the script setting, you will get two options; Save changes and Save changes & empty cache. We recommend going for the second to empty the cache.
Image Optimization
The image tab is to optimize images present on your website for better performance. Shortpixel’s Optimize Images feature will help make your website more lightweight by compressing the images.
In Image Optimization Quality, Autoptimize offer three compressions so you can choose the one that fits your website. There are two more options: loading WebP in supported browsers and lazy-load images. Although lazy-load images can reduce loading time, their display may annoy your visitor.
Extra Auto-optimization
Go to the Extras tab and select some of the boxes based on your preferences if you want more detailed options. You should read each section carefully because the explanations are understandable. Make sure you click Save Changes after reading each section.
Optimize more
If you want more optimization for your website, the developer recommends some useful WordPress plugins in this tab.
When it comes to WordPress website optimization, there are many ways to do it. You can optimize your website with and without plugins. Autoptimize, Jetpack, and WP Rocket are some of the popular options for website optimizations.