Summary: Learn how to install, activate, set up, and use the Wordfence plugin against various security threats to protect your website
Introduction
Protect your WordPress website with Wordfence plugin from various hacking attempts. It comprises of malware scanner and firewall to safeguard your site from security threats including:
- Hacking
- Malware
- Brute Force attacks &
- DDOS
The firewall further filters visitors clicking into your website and obstructs doubtful requests. And the malware scanner scans everything:
- Core Files
- Plugins
- Themes
- Doubtful Codes
- Folders uploaded for transformations etc
So don’t waste your time and safeguard your website with Wordfence security at once. Here I will show you how to install and do the setup.
How To Install The Wordfence
1. Install
The first and foremost step is installing the Wordfence plugin. You can easily install the security plugin with the following easy steps:
Login into your WordPress site
Once you open your WordPress site you will get to see something as “example.com”. So in place of “example.com”, type your website and ENTER.
Your Website Opens
There you are. Your website opens up and you need to fill the form giving your details including:
- Email ID or Username
- Password
No sooner than you have entered the details your WordPress site opens.
Click On Plugins
Signed into your WordPress account you can administer the website as you want. Open the WordPress Dashboard and click on “Plugins”.
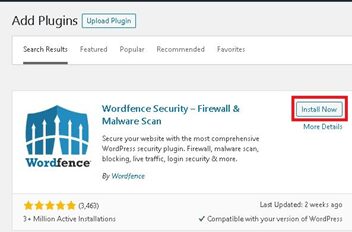
Once you click on Plugins a Pop Up containing subdivisions opens up. From there, click on “Add New” and in the search bar type “Wordfence” with NO quotes.
Click On Install
Click on the option “Install Now” and within a few minutes, the security plugin gets installed on your website.
2. Activate

The Wordfence plugin activation page gives you a complete overview of your site’s security settings. You can also get stats and notifications such as:
- Blocking IP
- Failed Login Efforts
- Number of Blocked Attacks etc
To activate the Wordfence follow the steps mentioned below:
- Sign-in into your WordPress Website
- Click on Plugins
- Click on Installed Plugins
- Click on newly installed Wordfence
- Click Activate
Once activated the plugin adds a new item in your menu “Wordfence” in the admin bar. Click on it to go to the plugin’s settings. You can follow the documentation for setup and configuration.
3. Setup the Wordfence Security Plugin
As I have already discussed in the beginning it (Wordfence) comprises a firewall. The next step in the process of installing the Wordfence plugin is to set up the firewall.
PHP based firewall application delivers protection up to two layers including:
Basic Level
It is enabled as default letting the Wordfence security plugin to function as “WordPress Plugin”. This implies the firewall gets loaded with other WordPress plugins.
And it safeguards your WordPress site from different threats but misses the threats made to set off before the WordPress plugins and themes getting loaded. For Basic Setup follow the steps mentioned below:
- Go to Wordfence
- Click on Firewall
- Click on the section “Basic Firewall Options”
- Then “All Firewall Options”
By doing this you get three options which you can set up according to your needs. Have a look at them:
- Enabled & Protecting – At this mode, the firewall blocks the requests matching with the known attacking patterns thereby safeguarding your website from hackers.
- Learning Mode – Using the mode you can avert the fake positives on your website.
- Disabled – As the name implies the function remains off and never runs or analyzes requests in either of the ways.
Choose one and then do the setup.
Extended Protection
This is the second protection level offered by the Wordfence firewall. It allows the security plugin to function before the WordPress Core, themes as well as plugins.
Extended Protection delivers better protection against complicated security threats to your website. Here is the process to set up the extended protection level of the Wordfence security plugin:
- Go to Wordfence
- Click on Firewall
- Click on the button “OPTIMIZE FIREWALL”
By doing this you set up the extended protection level of Wordfence. It runs a few tests on the background to sense the configuration of your server. If you feel that the configuration varies from what the Wordfence security plugin has chosen then you can opt for the other one.
Click on “Continue”.
Wordfence now asks you to download the present .htaccess file for backup. For this click on the button “Download .htaccess file”. Click on “Continue” after the backup file gets downloaded.
Now it updates your backup file which lets it run before the WordPress. And you are redirected to the page of “Firewall” where you can view the level of protection as Extended Protection.
Remember the settings for Wordfence are classified into variant sections. Default settings usually work for several WordPress websites. However, review them still and change if you feel the need.
To check this you can scan the Wordfence Page.
4. Scan
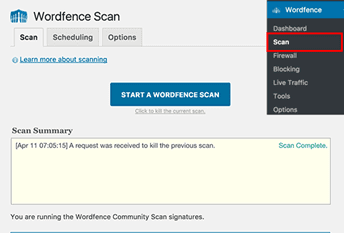
Open the Wordfence plugin and click on the option “Scan”. Then click on the button “START A WORDFENCE SCAN” below.
Wordfence begins its duty. It will begin scanning the files in WordPress. And then check for changes in sizes of these plugin files and WordPress Core. Of course, the scanning doesn’t end here as it takes into account other things including:
- Checking doubtful codes
- Malicious websites
- Backdoors &
- Recognized infection patterns
Usually, the scans require many server resources for operation. Wordfence security plugin runs scans as effectively as possible. The time required for scanning the whole varies on the accessible server resources and your amount of data.
On the page of the scan you can view the progress in yellow boxes and mostly it will contain technical information. Don’t panic as you can see the results in Wordfence when the scan completes.
Wordfence security plugin immediately notifies you for any:
- Infections
- Doubtful Codes
- Malware or
- Corrupted Files
Further, it recommends you take the necessary actions required to fix those problems. It automatically runs scans on your website once in 24 hours. With the premium version of the Wordfence plugin, you can set the scan schedules as you desire. Also, you get access to more advanced options like updated firewall rules and country blocking, etc.
Reference source
Thank to WordPress.org
Related articles