Summary: Install, Activate, and start using All In One SEO Pack Plugin to optimize your website for higher rankings in the search engines.
To boost the number of visitors to your site one of the effective ways, to begin with, is content optimization both in terms of:
- Pages &
- Blog Posts
All In One SEO Pack Plugin helps you optimize your website content to attract more traffic and retain them for longer. Here we take you through a detailed analysis of how the WordPress plugin works for your website.
All In One SEO Pack

By now you may have guessed what the plugin is all about. True to its name All In One SEO Pack Plugin comprises all the features to help you optimize your website and see it at the top of search engines.
The SEO plugin paves the way for optimizing all your pages and blog posts for major search engines like Google.
Features Of All In One SEO Pack

All In One SEO Pack offers you a wide range of optimization features for your website including:
- File Editor
- Social Meta
- txt
- XML Sitemaps
- Bad Bot Blocker
- Importer and Exporter
- Performance
Except for Performance, you need to activate the rest of the features following the process:
- All in One SEO >> Feature Manager
Once you activate a module it automatically gets added to the Menu of your plugin. Visiting the page you can configure how that specific feature works for your website.
Additional All In One SEO Pack Pro Features
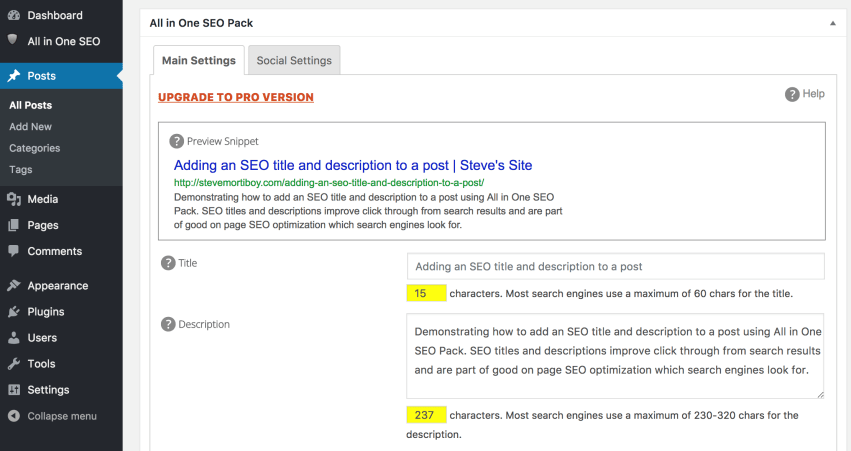
Upgrading All In One SEO Pack Plugin will allow you to enjoy some more features to optimize your content. They include:
- Video Sitemaps
- E-Commerce SEO
- SEO for
- Tags
- Categories
- Custom Taxonomies
- SEO Module for Video
- Access to Pro support forums
- Entree to the Knowledge Center
- Professional Support up to 1 year etc
All these features show how you can enhance your website for complete SEO.
Importance Of ALL In One SEO Pack

SEO or Search Engine Optimization is the mantra to get your site higher ranking in search engines including Google.
Undoubtedly WordPress delivers a user-friendly setup in the dialog box. However, there are other such things you need to work upon to enhance your website like:
- Addition of Meta Tags
- Creating XML Sitemaps
- Preventing Duplicate Contents and lots more
The WordPress plugin assists you in such things that combine into your dashboard with an easy user interface.
The more your website becomes friendly to search engines the more you come across new visitors and increase your sales further.
How To Install & Activate All In One SEO Pack

Since the beginning, we have been discussing the All In One SEO Pack and its importance but how do you install & activate it.
It is just easy installing the WordPress plugin followed by entering the details including:
- SEO Title
- Meta Description &
- Desired Keywords
You have to follow the usual process to install & activate the All In One SEO Pack Plugin. There are 3 different ways for the process. Have a look at them.
1. WordPress (WP) Plugin Search
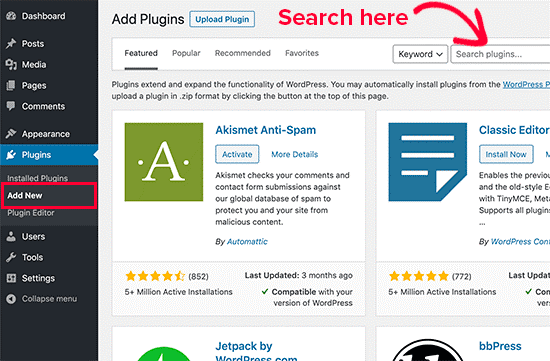
This is one of the easiest ways to install a Plugin.
- Visit Plugins >> Add New under WP Admin area >> Search Plugins >> Find >> Download >> Install Now
(Clicking on Install Now will automatically convert it into Activate option). Then click on the Activate option.
The downside is it gives you access to the free plugins directory only.
2. WordPress (WP) Admin Plugin Upload
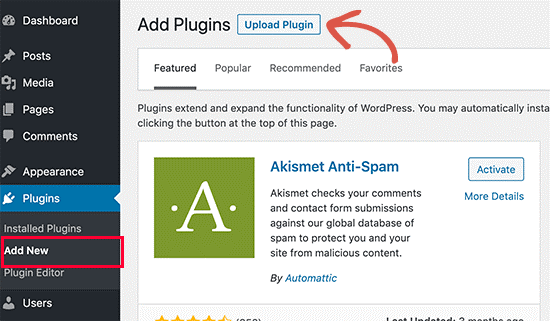
To combat the limitations of the first method, WP came up with the UPLOAD option under the Admin.
- Firstly download All in One SEO Pack from the directory (Remember to convert it into a Zip file)
- Secondly, open the Admin page and Visit Plugins >> Add New
- Thirdly go to the top and click on Upload Plugin. This will open the upload form.
- Fourthly select the downloaded plugin file clicking on the Choose File option
- Fifthly click on the Install Now option. Once installed click on Activate Plugin
3. WordPress (WP) Plugin Through FTP
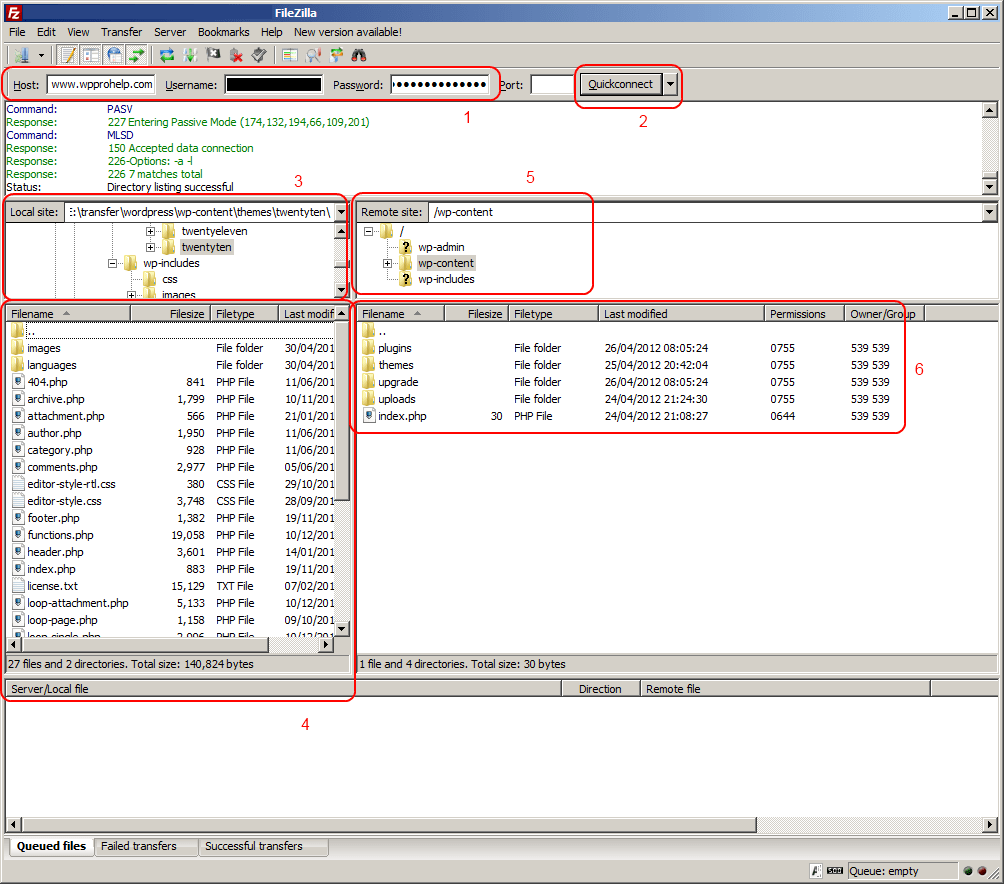
If you see there are file restrictions not allowing the installation of All in One SEO Pack then this is the best method to use.
- Firstly download the file source of the plugin (Zip file)
- Secondly, extract the file to your laptop or desktop which will automatically create a new file with a similar name which you should upload manually to your site through FTP client
To do this you should have the Username & Password to access the host with the help of FTP Manager. Contact your WP host provider for the same.
- Thirdly Use the Login details to open the FTP client and link it to your site. Once done go to /wp-content/plugins/ folder
- Fourthly upload the extracted zipped file to the folder (shown above) on the server
- Fifthly open the Admin page on WordPress after installation and then click on the Plugins option
- Sixthly click on the Activate option under the plugin
This can be a bit tough for beginners.
How To Setup All In One SEO Pack
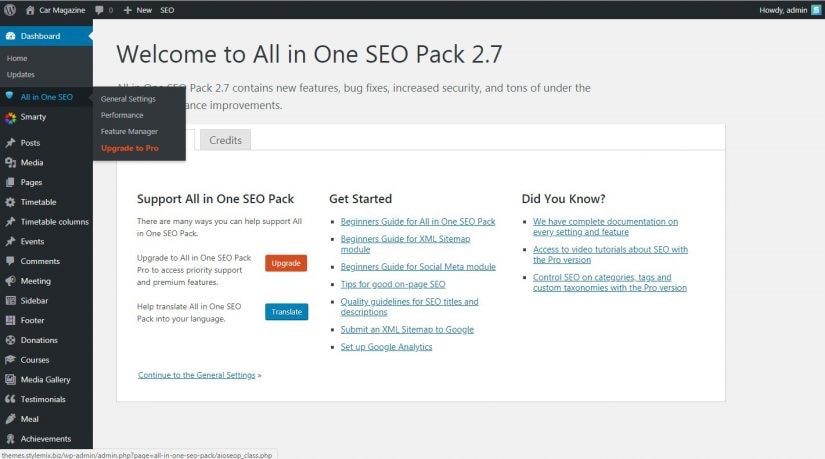
Now that you have installed the All In One SEO Pack Plugin you should do a bit of setting so that it works effectively for your website. To customize the settings you have to go to
- All in One SEO >> General Settings
There are plenty of options on the page of Settings. Also, there are question marks for every parameter. Clicking on each of the questions marks it displays a HELP message regarding that specific parameter and how it functions.
All In One SEO Pack Pricing

As already said the pack is available for free as well as paid versions. Speaking about the free version 90% of users are satisfied using the plugin without doing any transformations to settings.
However, if you want to get something extra then upgrading the All in One SEO pack proves fruitful with more features (as discussed already).
Usually, the Pro versions are classified into 3 sections such as:
- Individual
- Business &
- Agency
All of them have different prices and work up to the number of websites. So choose which All In One SEO Pack Plugin option is suitable for you and opt for the same accordingly.
Related articles:
Loco Translate Plugin – Easy WordPress Website Translation
Contact Form 7 Plugin – Everything You Need To Know
